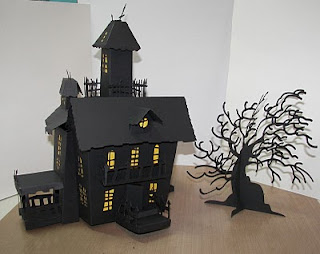
I made the 3D haunted house and wicked tree from the Happy Hauntings cartridge. It was fun and not that difficult at all! It looks awesome! I want to get one of those battery operated tea lights and put it underneath the house so the windows look lit up! Who knew that paper crafting could be so fun! Try it if you have this cartridge. It is worth it at the end! Happy Halloween everybody!!!!!!!
Saturday, October 30, 2010
Wednesday, October 27, 2010
Halloween Cards and Cookie Towers
I made my three daughters a Halloween card and a cookie tower. I love how they turned out. They all three received them in the mail today so now I can post them and I have a couple of videos. These were a lot of fun to make. The videos take a lot of time to edit! I was having trouble getting them posted. I had to make them in two parts! The stamps I bought at Archivers and I used copic markers to color them. The witch's shoe was cut from Happy Hauntings cartridge at 3 1/2 inches. Enjoy!
Tuesday, October 26, 2010
Great Nephew's 1st Birthday Card
My great nephew is going to be 1 year old! It is hard to believe! This year has flown by. I made him a card that goes along with the gift that my daughter and I bought for him. It is a big dump truck with large leggos in the truck bin. He should love it! I cut the words out using my gypsy using San Serif cartridge and welding them together. I then cut the dump truck out at 2.5 inches from Everyday Paper Dolls cartridge. The words were kind of big and I didn't have time to re-cut them smaller so I decided to just put the "birthday" word on the inside! I used gunmetal stickles on the truck. I used pop dots to adhere all the words as well as the dump truck.
Sunday, October 17, 2010
My Daughter's Birthday Trifold
We celebrated my daughter's 25th birthday today so I can now post the trifold card that I made for her. It is similar to the one that I made for my best friend in an earlier post except I personalized the embellishments for my daughter. I added metal corners that really helps the stability of it when standing it up for display. Using the Tim Holtz metal embellishments adds weight to the card so these reinforced the corners well. I love it! I think she did too. If I ever get my video edited I will upload it.
Let it Snow stamp
I fell in love with this snowman stamp at Michael's. Of course I used a 40% off coupon to boot! The stamp set includes 2 sheets of 16 clear stamps by Inkadinkado. I wanted to give my copic markers some time also! (LOL). Here is a very simple but fun winter card even though I am making it "snow early". I really need to get moving on some more Halloween cards before the holiday is over with. I just got side tracked with the Christmas cards. So much I want to do and so little time....:) Hugs to all, Nancy
Friday, October 15, 2010
Operation Write Home and RAOK
I hope to cover two challenges here. One for Christie,(http://creationsbychristie.blogspot.com/2010/10/operation-write-home-holiday-card.html#comments) Operation Write Home, and one for RAOK for http://www.mypinkstamper.com/
The Christmas tree was cut from Christmas cartridge using my Gypsy at W 2.95 x H 4.00 shadow W 3.02 x H 4.00. The inside of the tree with start was cut at W 3.29 x H 4.92. The shadow star is W 1.91 x H 4.92. I layered the tree with a very dark green underneath then a lighter green in the middle and then used soft scotch sponge type pop dots to raise the outside layer up a bit. The sentiments come from MPS "Christmas Wishes". I ran the outside layer of the tree through the cuttlebug using Tim Holtz's "cracked" embossing folder. I then inked it with shabby shutters distress ink. I ran the overlay through the snowflake cuttlebug embossing folder and inked it with tumbled glass distress ink.
I had made the other card's tag while at a weekend getaway crop a few weeks ago. I used Snow Cap dabber paint to stamp with Tim Holtz's Christmas stamps. I inked with different shades of distress inks. I believe they were fire brick, shabby shutters, vintage photo and a touch of walnut stain. I added a Spare Parts by The Paper Studio brad that I bought at Hobby Lobby. The Silent Night stamp is from MPS "Christmas Wishes". I was glad to put this tag to good use. I will send these two cards to Christie Hund so that she can send them on to the men and women in our military. I think that this is a wonderful idea!
Thursday, October 14, 2010
Tri-fold Card
I have always wanted to tackle one of these trifold cards so I did so tonight with a vengence! Ha Ha! I also managed to get a video posted that is half way decent! My girlfriend loves vintage and her birthday was Oct. 5. She was out of town so I didn't send her card yet. I may have to hand deliver this one but I will go to the Post Office tomorrow just to see what the actual postage would be. It is a bit heavy because of all the Tim Holtz "toys" that I put on it. I got the sizes from a web site one day and just saved them in an email to myself so that I would have them. I embossed the main card with the Clockworks embossing folder. I then inked the embossing with many different distress inks using an applicator. A lot of that inking doesn't show because of the patterned paper that went over top of the areas but it is along the borders. I embossed the patterned pieces using Tim Holtz's Patchwork embossing folder. That way I was able to get many different patterns on the many different patterned pieces running it through the cuddlebug just once. I used walnut stain distress inks with an applicator to bring out the embossing on those pieces. I inked all sides of the entire card. I made fragments using snip-its from Tim's Lost and Found paper pack. I used various ribbons from my stash. I had a few rub-ons that I used for the Happy Birthday sentiment and Celebrate Friends. I used Tim's distress hammer to distress the long brads that hold the fragments and vintage flowers/trinkets in place. I used snow cap dabber paint on the metal pieces. The music tissue is Tim Holtz also. All in all it took some time to do but I love how it turned out! I hope you do too!!!!! Enjoy! Oh, and P.S. I took it to the post office and it cost me .88 to mail it....only 2 stamps! Not too bad!
cardstock: 12 x 5.5
score at 1.5 and 4 inches length wise
score at 2, 4, 8 and 10 inches width wise
patterned paper:
2 pieces- 1.75 x 5.25
1 piece- 3.75 x 2.25
2 pieces- 3.75 x 1.25
4 pieces- 1.75 x 1.25
2 pieces- 1.75 x 2.25
score at 1.5 and 4 inches length wise
score at 2, 4, 8 and 10 inches width wise
patterned paper:
2 pieces- 1.75 x 5.25
1 piece- 3.75 x 2.25
2 pieces- 3.75 x 1.25
4 pieces- 1.75 x 1.25
2 pieces- 1.75 x 2.25
Wednesday, October 13, 2010
My Sister's Anniversary Card
Well, here it is my sister and brother-in-law's anniversary today and I am just making the card. I called her and told her that the card was in the mail!!! Ha ha! I like how it turned out. I tried videoing it and I have to edit it. I am trying to get better lighting for my videos so be patient with me. I am discovering as I go. This paper is from pack called Latte and I believe I got it at Hobby Lobby but I am not positive. I have had it for awhile now. I didn't have another flowered piece big enough to make a totally matching envelope so I just used a coordinated pattern from the package that complimented the green on the card. I cut the address labels from George and Basic Shapes cartridge using my Gypsy. I applied them with Zip Dry to be sure that the stay adhered. I used my Chomas Creations silver glitter pen to write out the Happy Anniversary sentiment from Lyrical Letters Cartridge. It was cut (written) at width 4.18 x height 1.50 and the rectangle was 2.00 x 5.5. (again from George and Basic Shapes Cart.) The ribbon I bought at Michaels and I love this two sided ribbon! I bought as many different ones in as many different colors that I could find! I made an A2 envelope using my Martha Steward scoring board. Now, I better go get it in the mail like I said it was!!!!!
Tuesday, October 12, 2010
Another Christmas Card
I was fooling around with my cuddlebug winter embossing folders and decided to finish this Christmas card. I also bought Nestabilities on clearance at Hobby Lobby and the red square was cut from that. I popped up the snowflake with a pop dot. It is a little bit bigger than an A2 card so I had to make the matching envelope a bit bigger to fit. I liked it better after using my gel pen to stitch around the embossed area. The envelope and lining of the back of the card is a paper I found in the clearance bin at Hobby Lobby. I love the shade of blue that it is. I used stickles on the snowflake that I punched out with my Paper Studio clearance punch from Hobby Lobby. I added ribbon that I had in my stash to wrap the colors together.
Saturday, October 9, 2010
MPS Make Something Winter Challenge
I decided to give MPS's challenge a go! So off I went to Hobby Lobby where I bought lots of goodies in the clearance aisle! You have to love the clearance aisles!!!!! I found this awesome snowflake punch for $3.59. The Christmas papers I got 6 sheets for a dollar! Well, I made this colorful Christmas card and used my new mypinkstamper "Christmas Stamp Set" for the sentiment. I love the various colors. I had purchased the iRock tool and gems with a 40% off coupon from Michaels and this was the first time that I ever used it. I did find that it took lots and lots of patience working with those little gems for sure!!!!! But it added some nice bling to the snowflakes! I then used my Martha Stewart scoreboard and made a matching envelope. I only wish that I had enough of the tree paper left because I wanted to line the inside triangular flap with it but I had only pieces left that did not go in the right direction as far as the print goes. All in all I was happy with how it turned out. Enjoy!
Wednesday, October 6, 2010
Anniversary Card
My brother and sister-in-law are celebrating their 31 st anniversary so a card was in order. It is a 5 1/2 x 8 inch card. I used a 12 x 12 paper from one of my paper packs, I can't remember which one, for the overlay and the matching envelpe. I just got some Chomas glitter pens and the holder and I couldn't wait to give them a try. I used the silver glitter pen and drew the Happy Anniversary with champagne glasses from Calligraphy Collection cartridge. I loved it written out using the cricut. It shimmers more than the picture actally shows. The inside stamp was a Fiskars stamp set that I bought at Jo Anns Etc.
Subscribe to:
Posts (Atom)