Here are some photos Christmas gifts that I made for my adult children. They love their animals so I printed their favorite pics onto tissue paper that had been taped to a piece of cardstock. I carefully removed the tissue paper and let the picture dry. I then painted modge podge onto an 8 x 10 canvas and CAREFULLY layed it over the canvas. Then I gently patted down with two fingers all around the photo so that the print takes on the texture of the canvas. I included a close up of the dog so that you can see the texture. Then I cut the edges as close to the edge as possible and stuck them down with modge podge. They loved the gifts a lot! I printed my newly married son's wedding photo in color since they have no animals. I just realized that I didn't take a picture of that one but I will and I will post it at a later date. I printed two of my daughters' dog and cats in sepia since they love that tone and have a lot of browns in their apartments. The other daughter's cats were printed in gray tones since she had her apartment decor in grays and blacks.
Tuesday, December 27, 2011
Christmas gifts
Here are some photos Christmas gifts that I made for my adult children. They love their animals so I printed their favorite pics onto tissue paper that had been taped to a piece of cardstock. I carefully removed the tissue paper and let the picture dry. I then painted modge podge onto an 8 x 10 canvas and CAREFULLY layed it over the canvas. Then I gently patted down with two fingers all around the photo so that the print takes on the texture of the canvas. I included a close up of the dog so that you can see the texture. Then I cut the edges as close to the edge as possible and stuck them down with modge podge. They loved the gifts a lot! I printed my newly married son's wedding photo in color since they have no animals. I just realized that I didn't take a picture of that one but I will and I will post it at a later date. I printed two of my daughters' dog and cats in sepia since they love that tone and have a lot of browns in their apartments. The other daughter's cats were printed in gray tones since she had her apartment decor in grays and blacks.
Monday, December 12, 2011
Day 12 --12 Tags if Christmas!!!!!
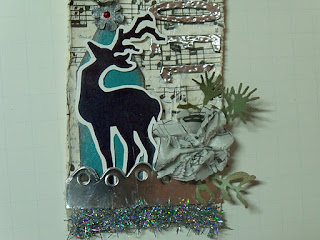
Day 12 is here! I managed to complete all 12 tags! I didn't have any 3 D embellishments to glue onto this tag so I had stamped the deer from Season's Silhouettes stamp set onto glossy paper and trimmed closely around the stamped image. I like how he is offset of the black and white tissue paper background. I kind of fell in love with the tag as I was making it. I ran the noel through my cuttlebug and glued it onto black cardstock and then proceeded to hammer it with the bumpy side of TH hammer.. I like the worn look that the foil took on. It has been fun making these tags but now I better concentrate on getting some baking done! Ha!
Sunday, December 11, 2011
Day11--12 Tags of Christmas
I do not have a melting pot or shrink plastics so I made my embellishments look dimensional by using pop dots to mount them and lots of Holly stickles to thicken them up. The only Santa stamp that I had with some white in it was this Santa face. Also my stickles were not completely dry when I took my picture. I think I created the look that Tim was going for with what I had!
Saturday, December 10, 2011
Day 11--12 Tags of Christmas
Here is tag #11. I love using music stamps for backgrounds. I tried TH technique for the facets but since I only had charms mine worked better just using glossy accents to adhere the paper to the charm. When trying the packing tape technique my paper faded too much. I wonder if that improves with facets? I didn't have his letters so I used some stickers and painted the letters gold with a dabber and then used a copic black marker to outlie them since they didn't show up very well. It was a fun tag to do!
Friday, December 9, 2011
Day 9--12 Tags of Christmas
I really love this technique. Go to http://www.timholtz.typepad.com/ to learn how to do it. I love embossing over distress ink. The colors are great too! I love how glossy accents makes the letters have dimension. So fun to make and pretty easy too! I didn't have his background stamp so I just used one in my stash and stamped it around the tag to make it appear as a background stamp. I then used my cricut to cut out the word PEACE using the Blackletter cartridge since I didn't have the TH die cut. It matched pretty well I thought! Onward to day 10!!!!!
Thursday, December 8, 2011
Day 8!!--12 Tags of Christmas
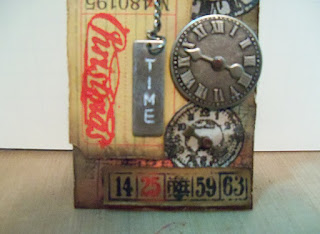
I managed to finish tag 8 before midnight! Yeah!!! I don't have a lot of steampunk things so I managed to give it that type of feel with what I already had. I embossed the clock stamps on grungeboard and distressed ink them a bit. I sprayed perfect pearls on top. I used red pepper dabber paint to make the Christmas stamp on the ticket. I used snowcap dabber in the metal "time" trinket. I also used the dabber paints to create the "bingo" number stamp and I used pop dots to raise the ticket, bingo numbers and metal clock. Not bad for not having a lot of the steampunk things I think....
Wednesday, December 7, 2011
Day 7--12 Tags of Christmas!
Well, I finished this tag one hour late but at least I got it done. I love it! I love working with the kraft glassine paper. It is very different and takes on some neat qualities. I rolled my music stamp for the background. I am finding that I am in need of some more distress stain colors as I do these tags! Shame on Tim for spending more of my money!!!! ha! Can't wait to see what is in store for tomorrow.....
Tuesday, December 6, 2011
Day 6 of 12 Tags of Christmas
This was a real challenge for me because I wasn't too attracted to this tag but it turned out so much better in person than in the pictures as Tim said it would. I used what I had to emboss with Christmas sentiments. It took a lot of patience to paint it but it is a real different look. Visit Tim at http://www.timholtz.typepad.com/ to see all the instructions on how to make this tag.
Monday, December 5, 2011
Day 5--12 Tags of Christmas
Here is Day 5 tag! Yeah! I am all caught up except tomorrow morning there will be another tag to do! Ha! It is fun but does take some time especially around this busy time of year. I did not have the wreath die cut that Tim used so I just made one out of the greenery in the pine cone die cut. It seemed to suffice. Also I don't have the reflections stamps so I just used a music stamp that I had.
Day 4 ---12 Tags of Christmas
Okay! I finally caught up. I am posting this Day 4 tag one day late but I got it done nonetheless. I was a bit disappointed in my crackle effect. I should have been a bit more patient. I didn't have the snowflakes on the edge so I made my own by cutting out the snowflake from Winter Wonderland three times and glueing them to another piece of acrylic packaging. It worked fine!
Sunday, December 4, 2011
Day 3 but it is really Day 4! Ha!
Yes I am still behind a day. I thought that I would catch up today but Christmas shopping took up most of my day and evening I did manage to accomplish making this tag without the cut'n dry felt that it called for. Refer to Tim's blog to get all the imformation. http://www.timholtz.typepad.com/ I just used a piece of felt on top of a thin foam board and it worked okay. I think I overdid it with the perfect pearls. It is on a bit thick and it is hard to read my stamp on parts of the tag but all in all it came out better than I thought it would...Maybe tomorrow I can manage to get 2 tags done and be on the right day!
Saturday, December 3, 2011
Day 2
Yes , I am behind but will catch up tomorrow....Here is my day 2 of the 12 Tags of Christmas! Be sure to go to http://www.timholtz.typepad.com/ to follow along and give it a try yourself! Tim sure has some neat ideas and creates all kinds of inspiration!!!!!
Thursday, December 1, 2011
12 Tags of Christmas
I am going to try and do the 12 Tags of Christmas with Tim Hotlz. http://www.timholtz.typepad.com/ He sure does come up with some neat techniques and I love to try them all. He asks that you go to his blog to learn these techniques instead of me posting how I made this tag. This was a lot of fun to make and I love looking at other people's creations!
Monday, November 14, 2011
Great Idea thanks to a scrappin' friend!
Well my weekend scrap is over and it went super fast as usual. I am making a shower 12 x 12 scrapbook for my son and his new wife for a Christmas gift. I had so many photos and I hated not to use them all. Especially of her opening all her gifts and the tables of all the guests that attended. It would make the book way too thick if I did layouts of all of those photos. My friend that I go to the scrapbooking weekends with gave me the idea of making a book within the book! You make a cover bigger than the 4 x 6 pictures that you are putting in the mini book. I made my covers 5 x 7. I made my "present" cover using DS because you can stretch the image to the size that you need. I am sure anyone could do that in The CricutCraft Room that is now available to everyone at http://www.cricut.com/craftroom/default.html. You glue the back of the back cover to the page using glue dots for extra strength. Place the entire page into the page protector then using an exacto knife carefully make a slice through the page protector between the hinges and score line where the pages will be bent. ( score the pages approximately 1/4 to 1/2 inch from the left side of the mini book, hinge side.) Carefully place your hand within the page protector and bend back the pages in the mini book and slide them outside of the page protector through the slit that you had cut so that the book lays on top of the protector. This way many more pictures can be viewed on this one 12 x 12 page!
Friday, November 11, 2011
Cropping Weekend
Subscribe to:
Posts (Atom)